A step-by-step guide to creating the perfect photoshoot for your business’ website

I figured what would be the best way to help those of you that were looking to do your first personal branding photoshoot for your business?
I’d tell you all about my own photoshoots in a step-by-step guide, as I’d be able to tell you from the photographers side of the lens and the clients - YOU.
Where to begin? Hmmm let’s start at the beginning* shall we, the gathering of inspiration and finding out exactly what I wanted for my shoot - by which I mean, what I wanted my website and social media to look like.
What Do I Want My Website To Look Like?
I knew I wanted my website to have a light and airy feel to it, not fussy. So the shots would need to have simple backgrounds as in plain walls. For some reason that’s always been my website aesthetic that I gravitate towards. Yours might be, luxurious event spaces, on location in nature. Me, I likes a clean wall!
I also knew that for my recent shoot I wanted to add in the tools of my trade, my camera and laptop. Check! In this shoot I wanted to look like I was actually working in the most natural, non-cheesy way possible - is this possible? I like to think so, did I do ok?

In my very first photoshoot, it was just me smiling away and looking pensive. Imagine the scene where Joey’s telling the others his acting techniques, how to look like you were thinking, when in reality you’d lost your lines - it was called smelling the fart technique - what do you reckon, you think I nailed it? Here are a few shots from my outtakes (the first being the fart smelling one haha)
Photoshoot Brand Vision Board
So that’s what I started pinning in my Brand Vision board (see this post here on more deets on how to create your own) I searched for personal branding photoshoots, even as a photographer that’s what I do. I also look at other websites not just service based entrepreneurs. For instance I love Net-a-Porter’s EDIT online magazine shoots and the Flowerbx is beautiful. It’s not that I’m going to copy the shots, but it’s more so I get an idea of what I’d like to create.
Location, Location, Location
As mentioned above, it’s great to think about how you want your website to look. I’ve gone into a varied list of locations for you, as well how I shot mine, hoping it will give you some tips.
Do you like light and airy websites? Shoot in your home if it has lots of natural light or a family/friends place, outside where you know there are lots of plain walls, perhaps a cafe that’s super light and airy.
A more darker sexier vibe? This is slightly harder as a personal branding photographer, I always work with natural light and don’t shoot in the studio whereas you could hire a studio photographer and have them play with the lighting to make it all sexy and moody, with a dark coloured backdrop. The other alternative I would suggest is finding dark walls/backgrounds outside. Don’t go for dark locations as unless the photographer has great lighting for inside you won’t get the effect you want.
Earth tones? Shooting in Autumn is your best bet for this, other options are shooting next to brick, finding a great warm coloured earth tone wall, perhaps finding a plain white/cream background and your clothes reflect the colours of your brand. That last option could be for any type of colours you want.
Back to nature theme? - In your local park, a national trust country home with gardens, a pretty cafe with a nice garden.
Once you know that you can start thinking about where you’d like to shoot.
One last tip here, depending on your budget, you can rent a beautiful home on Airbnb for an extra cost to your shoot. This is really for those of you that are wanting to massively uplevel and have the most gorgeous photographs - knowing that they’ll be lots of places within a space for you to get different shots.
For my own shoots, I used a marble sculpture studio so that I had marble backdrops in my first photoshoot.
In my final one, I decided to shoot at home as I had lovely Farrow & Ball light clay pink painted walls which was exactly the colour scheme I was looking for in my branding.
Weather
Living in the UK, I know how unpredictable the weather with this in mind, I love to have a 2/3 possible days optioned depending on whether it’ll be raining or super sunny, personally I like a little bit of cloud especially if I’m shooting outside.
Both of my shoot days I was blessed with great weather <3
Outfits
My first point of deciding on what I’m going to wear is to either look in my wardrobe and see if there’s a theme going (bright pieces listed below) or I look at my Pinterest brand vision board to see what clothes the women are wearing from my inspo.
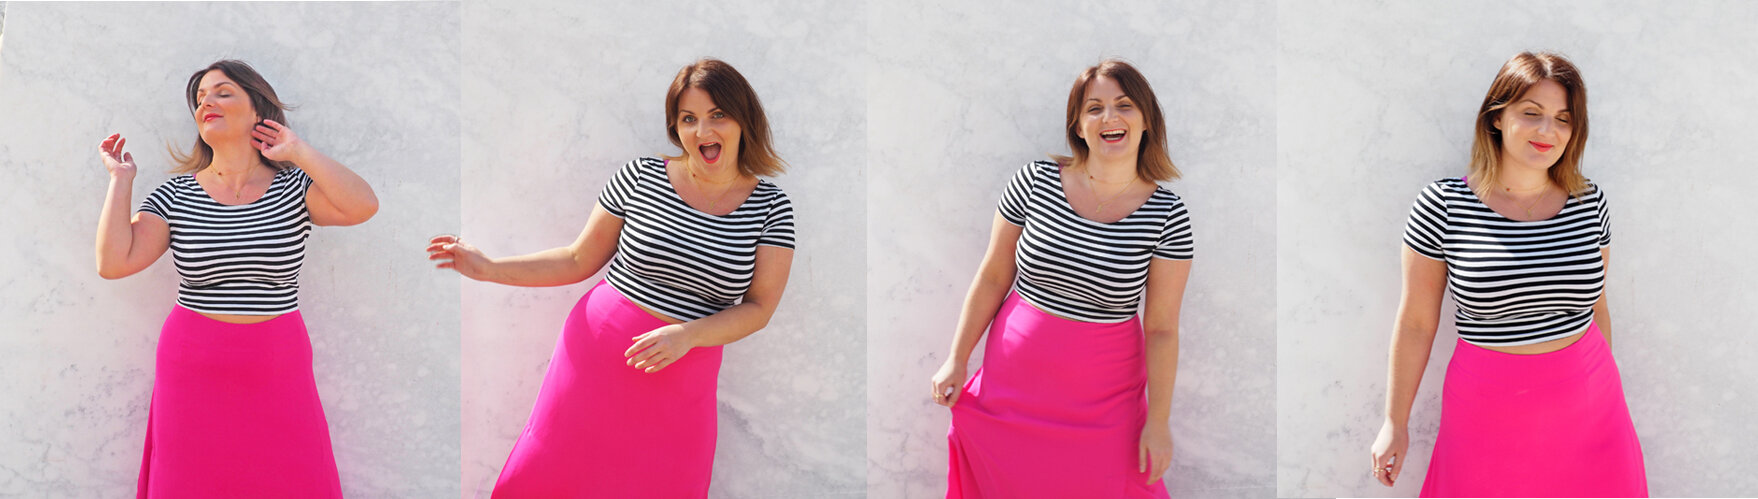
Brights - My First Shoot
My first ever shoot took place at the end of summer and I had a hella lot of bright, predominantly pink clothing in my wardrobe. So when it came time to take my photos that’s what I picked to wear as I liked the thought of my branding being super simple with the marble walls then with the pow of my bright wardrobe.
Toned Down - My Second Shoot
For my second outing, I knew I wasn’t that hot pink gal. I was living in my Tees and jeans, and loving more two piece ensembles. My friend Eva who’s a stylist took me shopping and I picked out some key pieces for the shoot - my fave being these flared white trousers which I LOVED!!!
You’ll notice that it’s a lot calmer and instead of my clothes being the highlight pop of colour, I used accessories and the buttons on my website to be the pop of colour instead.

Prints
I’m also not a huge fan of lots of different prints for shoots, prints can get outdated, they can look fussy and also when you have more than one it’s hard for them to all look nice next to one another in sequence. I much prefer colour block. And if you do use a print, I would not recommend using a really prominent one as on your social it’ll be more noticeable that you have the same outfit on evrey 12 or so squares if you reuse the shot in different poses.
Wear What You Love Not What You Think Others Look Good In
I’ll always remember when I was in my early twenties going to Ibiza for the first time and I had this idea in my head of what I SHOULD wear to fit in, not what actually suited me. It was a good friend of mine told me to just wear what I’d wear usually that made me feel amazing.
That had such an incredible effect on my always and I hope it does for you too. And that’s basically, don’t look at what you’ve pinned in your vision board for outfits inspiration thinking you must go get that oversize kaftan that looked so good on the straight up and down model, if you know it won’t suit your body type. For me wrap dresses are my friend and my tried trused jeans and Tee.
Prepare, Prepare, Prepare
This isn’t just your photographers responsibility it’s also yours to make sure you have the best shoot possible.
I looked at my mood board for inspiration and then started going through my own list of props for the shoot; what types of flowers would work well brand colour wise? What nick nacks may I like in shot? Did my nails look pretty? Were all of my clothes ironed before the shoot and shoes to match all lined up?
For my second shoot I also bought a colorama white backdrop roll to take photos in front of. Sometimes a wall you may think is lovely and blank, is actually facing the natural light in the wrong direction so you have harsh shadows on your face. This was you can very carefully cut out as big a piece you need, attach it to the wall directly opposite the window and boom, perfect light and bkgrd.
Strike a Pose
I know I'm repeating myself here, but keep on going back to that brand vision board. I always have posed shots to show my clients. I of course help them get comfortable and show them poses by doing them myself but there’s sometimes nothing like looking at someone doing it to help you get a banging pose.
Shot List
This is where I think about what I’m offering in my business as service based provider.
Ok so I’m going to be talking about being a photographer and website designer, I’ll want shots of me with my laptop and camera. Are there any shots on Pinterest I particularly liked that would be good to remember as composition shot?
I’ll want some nice smiling and serious (yeah who am I kidding, I don’t do serious!) shots for profiles and press.
I want some with a nice bit of wall space so that when I do Facebook ads, I’ll have somewhere to add copy in Canva or Photoshop, so that you can easily read it.
What would I like for my homepage shot? Definitely me at my desk, with both my camera and my laptop.
I really like to think about how the shots will be used on my website. For example I may want to have some of them as banner images at the very top of the page, which will have writing over the top, so the image can’t be too fussy, maybe I need to be wearing a white T-shirt so that the black website writing is easily read over the top.
Etc...
Hair & Makeup
For my very first DIY shoot, I did my own hair and makeup but for my second one I wanted to get a professional in - enter, Eva my London based secret weapon. She made me feel super pretty on the day and all of my friends commented on how lovely my makeup looked. So definitely worth investing in getting your hair and makeup done pro. These are the photos that represent you and your business. Even if it’s at the local makeup department (do a trial run!)
Photoshoot Day
My first shoot outdoors, just me smiling in front of the mable was super easy. Just me moving around and having a giggle.
The second shoot was much more considered, luckily through my prep work, I knew exactly what I wanted for that day.
As it inevetibaly is, my place ended up looking like absolute chaos. With moving things around all day to get the perfect shot, setting up various scenes - I know as a photographer, you just have to go with it and know you can put the place back to how it was at the end of the day.
Food
I wanted to add this bit in as it always seems to be something that falls by the way side at times for me on shoots. If we’re really getting into it, lunch may get forgotten about until 2/3pm when really you should have eaten a little earlier.
I had food delivered to my home (the location) for myself and hair & makeup, the photographer on the second shoot.
Usually if you’re shooting a cafe scene at some point in your shoot, I’d suggest doing that scene around lunchtime.
Insta Stories
I LOVE documenting the behind-the-scenes of my shoots, so that my followers get to see what actually happens on a shoot day. I would 100% recommend doing that on your own shoots as it can be really fun for your viewers to not just see the beautiful shots. Everyone loves an outtake, right!?!
Post Shoot
Once the shoot is done, I use a program called Adobe Bridge where I select down, what is usually around 1,000+ photos to around 200+. In bridge you can look at the images full screen on you computer, and by pressing the numbered keys (I start at number 1) on your keyboard you can easily make the selection. Once you have your first selection you can press number 2 on your absolute faves and even go up to number 3, for the ones you maybe want to use on your site and that you definitely want touching up.
Once I’d selected all my images, I uploaded them into Adobe Lightroom to colour edit every selected shot. For the ones that needed more than colour editing, I opened them in Adobe Photoshop and touched up things, like dirty marks on walls, adding an image to the blank laptop screen and - don’t judge me, I may have whitened my teeth in a couple of shots, sorry not sorry!
Image Size for Website
For Squarespace SEO purposes they say that you’re images should all be under 500KB, so I always create a Low-Res Web sized image to every HI-Res Print image that I send my clients and my own images are no different.
Sometimes when resizing them in Lightroom, the images may be larger than 500KB and in that instance I reduce them individually in Photoshop.
There are some free tools online if you google ‘reduce image size’ so you can reduce your images if needs be. Definitely do not upload super hi-res images onto your website as it will slow it right down and that affects your rating in google.
Social Media Tips
I have all of the images from my photoshoot on my desktop and often email myself ones that I want to upload onto social media.
My suggestion would be to upload your fave images into an app that you can easily use on your phone and save to your camera roll. This makes it quick and simple to upload when you;re out and about and not by your computer.
I like to upload a few onto my Planonly account so that I can preschedule my shots for Instagram. In the next few weeks I’ll be doing a blog post all on Planoly and why I think it’s such a fab app to plan out your social media in advance for business owners.
Voila that’s my very own step-by-step photoshoot case study. Would love to know if you have any questions you’d like to ask, I can answer them in the comments and perhaps update my post with them also <3