How to Resize and rename your Web Images to make your website more searchable
As a business owner, I know that I’m on a constant journey of learning new things every single day - especially after having been in a 9-5 job where I didn’t need to wear a million different hats like I do now.
But what’s really embarrassing is that it’s only been in the last couple of years as a Squarespace website designer that I’ve learned the ABSOLUTE importance of SEO (search engine optimisation) in getting your business found organically online via search engines like Google.
Sure I knew about it as a web designer but I hadn’t focused that much time into learning it, I always thought it would be a pretty complicated beast to go down that rabbit hole - so I never really did.
Until I did.
And it blew my eyes open.
I now find it really fun and exciting and am hoping to help you to feel the same way.
One of the steps in having great SEO is resizing images in squarespace (and renaming them) as this plays a HUGE role in search engines finding your website and whether customers will stay on your website, due to the slow or fast speed of your site.
As I said, up until fairly recently, I didn’t know the absolute necessity that images have in helping you get seen as a business owner from organic search - my aim is to help you learn everything I know about image optimisation so you too can be sure to get more seen, help more ppl with your offerings and make bank!!!
In this blog post I’m going to be talking about 3 key points…
Resizing Images
Renaming Images
Uploading Images to Squarespace
Let’s do this!
1. Resizing Images in Squarespace
WHY you should resize your Squarespace images?
So let’s talk about why resizing images in Squarespace is important in getting you seen by new potential clients in Google…
Faster page load time
Large image files take longer to load, which can slow down the loading time of your website. By resizing images to a smaller size, you can reduce the file size of the image, which helps to speed up page load times.
Improves your user experience
Your clients are more likely to stay on your site and engage with your content if they can access it quickly and easily. If your site takes too long to load, users may become frustrated and leave.
Improved SEO
Google considers page speed as a ranking factor, and slower loading websites may be penalized in search rankings.
Image Low Down: File types, resolutions, image sizes and widths
Ok so before we start with how to resize your images in Squarespace, I’m going to share with you what file types you can use on your site, what resolutions to use and what they mean and a rough guideline of how I resize my own website imagery and also my clients.
Image File Types
.jpg | standard website image file, this is the one I use the most when saving my images
.giff | animated image
.png | best for images with writing and ones where you want a transparent background, like a logo or an icon style image
Image Resolutions
Now I don’t want to get tooo into the boring nitty gritty of resolutions and colour format types but it may help you when you’ve had a photoshoot and your photographer gives you photos, you’ll know which file type you need for your website and what to ask them to give you.
Often you can ask your photographer for website size images and if they do that for you, ask them to make the images 2,500 pixels wide and 72 ppi resolution. Then you will always have the max website width ready to upload to your site and you can manually reduce the other images when you know which ones won’t be banner images.
Print ready images: 300 ppi (pixels per inch) resolution
Website ready images: 72 ppi resolution
Image Sizes - Under 500kb
For absolute best image optimisation you want each image file size you upload on to your website to be 500kb and under, preferably…
300-490kb for full width banners
100-250kb for smaller images
500KB is half a MB and the more MB’s - megabytes you have on your website the slower it will load and the slower your website pages load, the more Google penalises you and your customers get bored and leave.
Think of it in weight terms. If you have a backpack on, that weighs 28 pounds, it’s gonna be a hell of a lot harder and slower for you to climb the hill you’re walking up. If it only weighed 2 pounds, it’d be much quicker and easier for you. So basically, the less KB’s - kilobytes you save your images as, the faster your website will run!
**Top Tip: DON’T add images from the “browse stock images” option
When you’re adding or replacing an image in Squarespace there is an option to add images directly from a stock image website that Squarespace has partnered with Unsplash. You DO NOT want to add stock images directly to your website.
By adding them directly to your site this way, you aren’t able to rename the images or resize them which is not good for your site speed as usually these images are very large and often over 2mb.
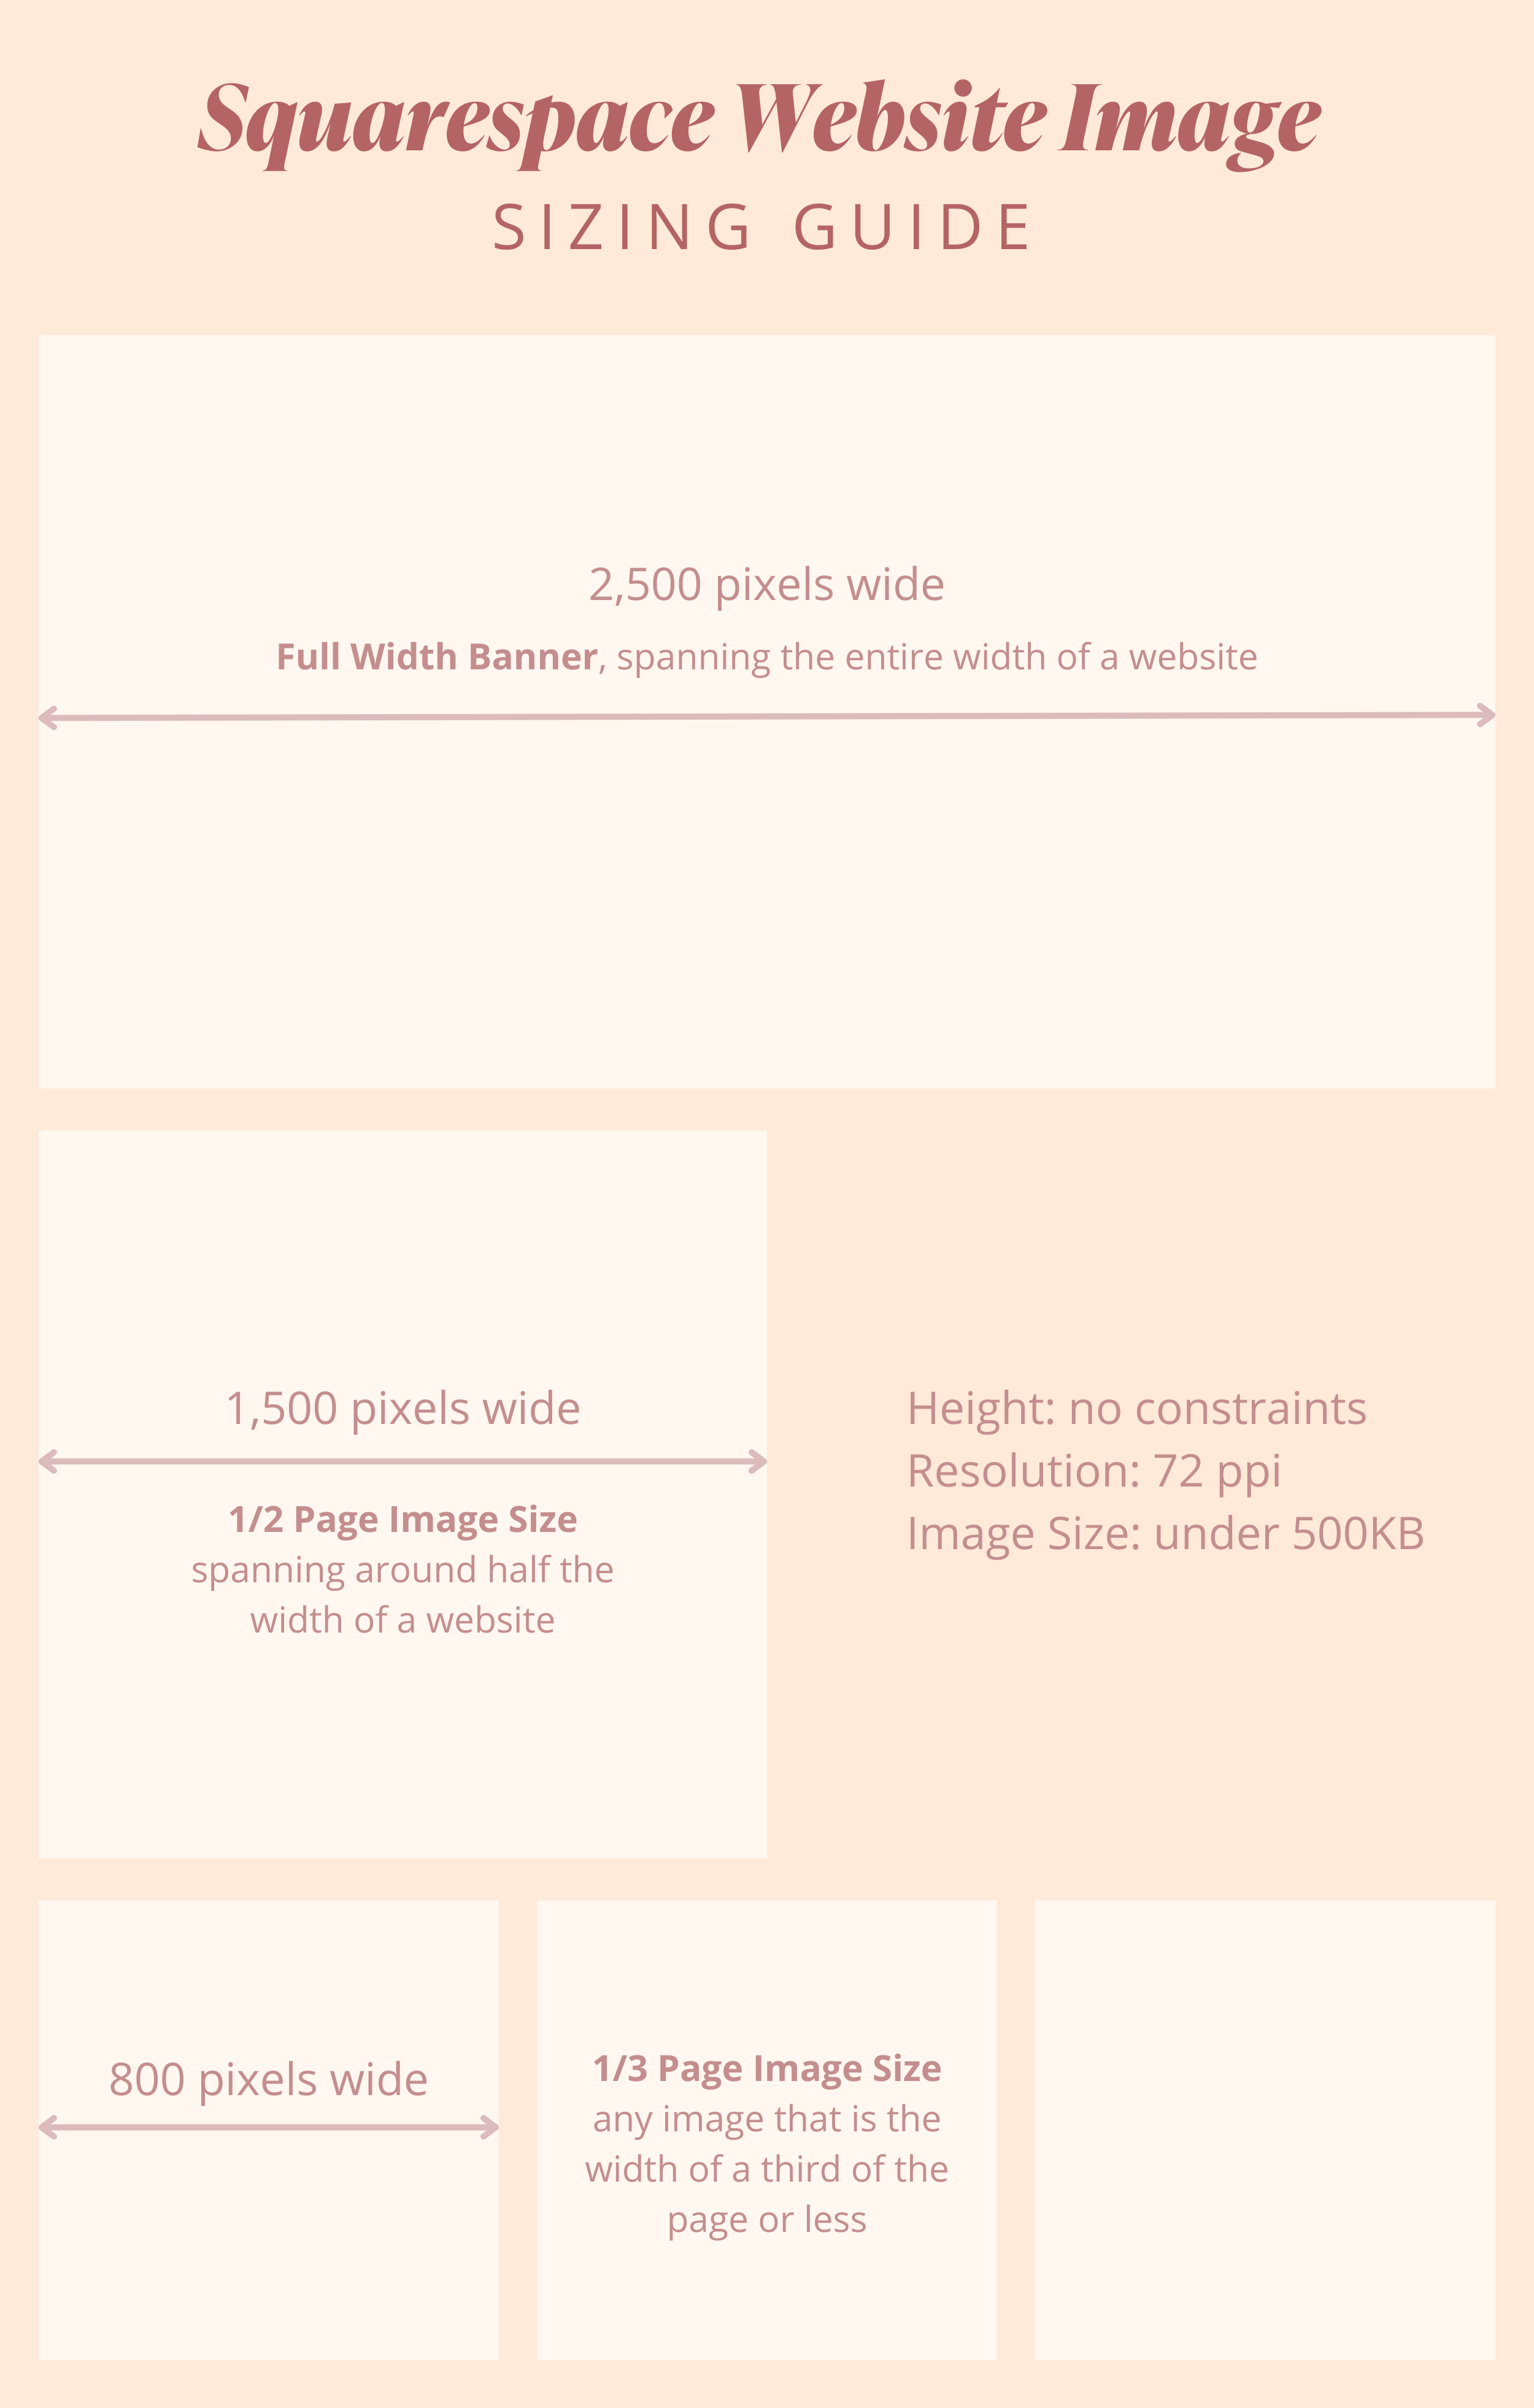
Image Widths
When you’re adding images to your website they are going to vary in width size. Some images may need to be full width - so take up the entire width of your website. Some will be half the website width and some will be a third or less for smaller images.
Full width banners - 2,500 px
½ page images - 1,500 px
⅓ page or less images - 850 px
Here’s a diagram I created for you to hopefully make image width sizing easier to understand.
HOW to resize images in squarespace
There are four ways I’m going to show you how to resize your images, you can pick which works best for you. I’ve created a video for you below as well as a done a step-by-step guide in the main blog continued below the video.
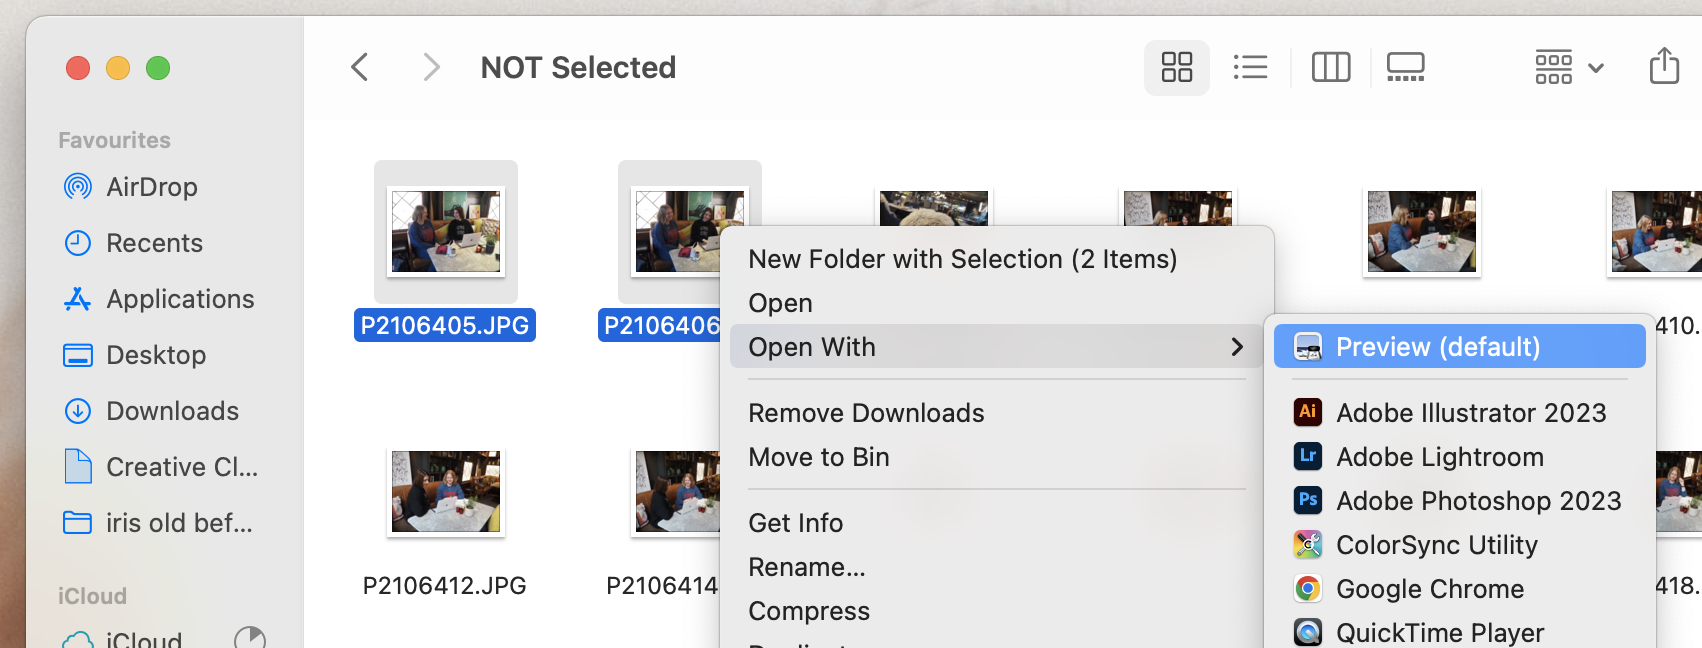
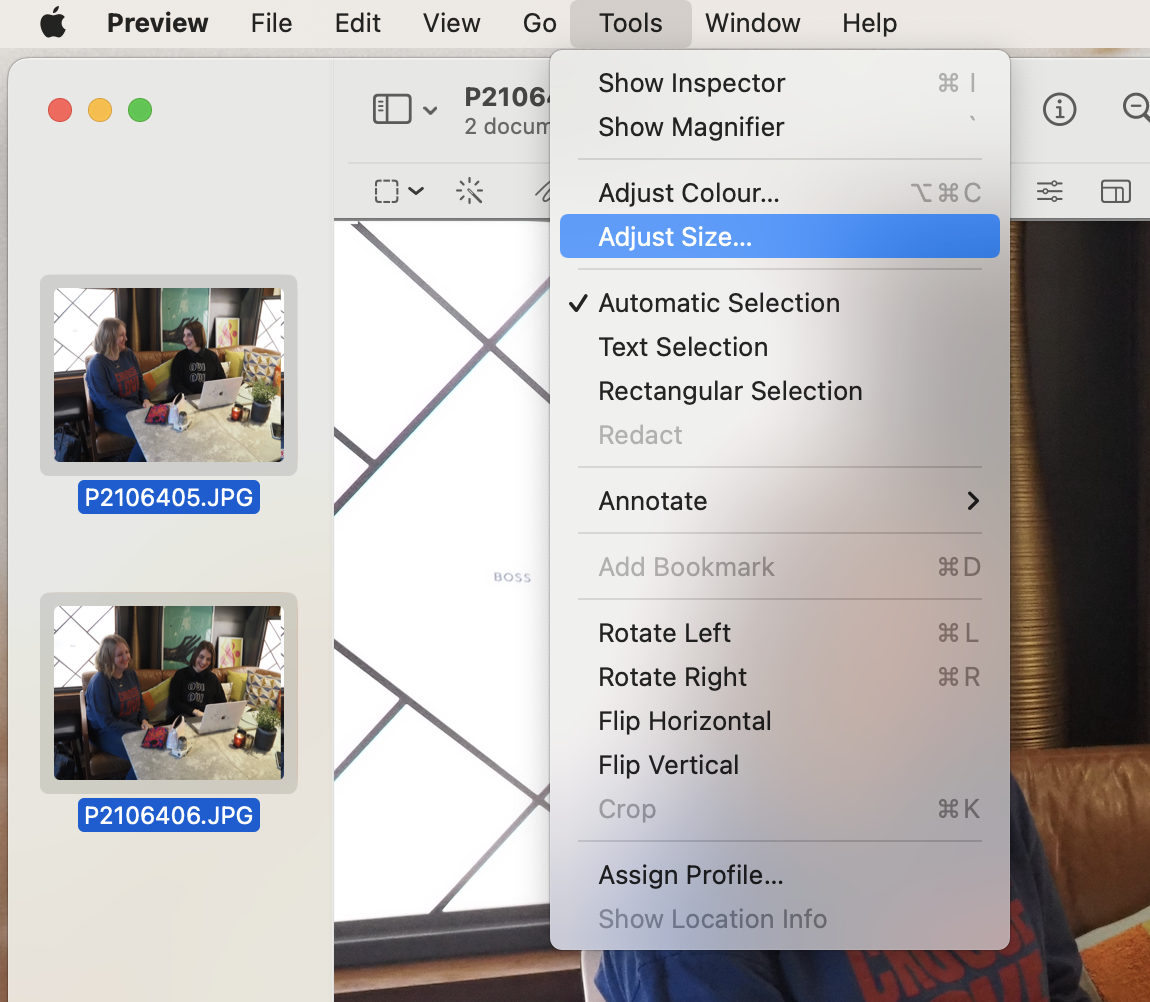
1. Mac users Preview
Select the images you want to reduce in size, by either dragging your mouse over the images you want to select or clicking the first image, pressing shift and then pressing the last image you want to select.
Right click on your selected images > open with > preview > highlight all the images in the left hand side column > tools > adjust size > adjust the sizing to what you want it to be and always 72 ppi

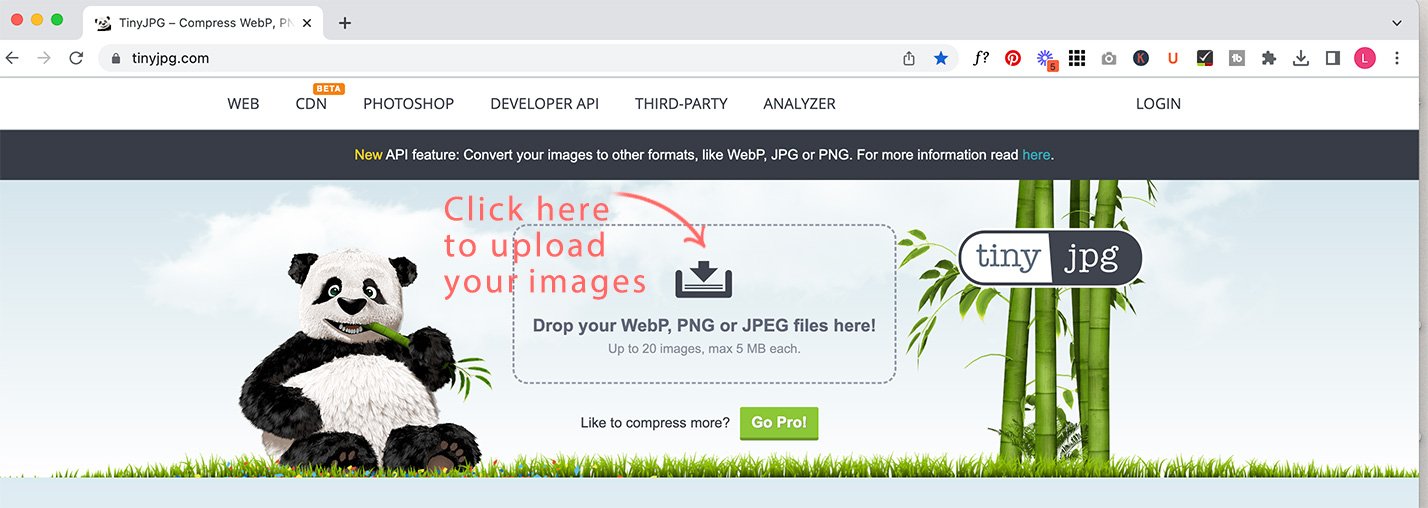
2. Tinyjpg
Upload your images in the main box that says “Drop your WebP, PNG or JPEG files here!”
Once it has resized your images, press “download all”

Click on the right hand tab “Bulk Resize” > select your images
In the left hand window, add the width image size you want and how many kb, remember to do it under 500kb


4. Lightroom Classic
Lightroom is a photo/image colour editing program from Adobe, so you can also colour edit your images in here but for the purposes of this post I’m going to be showing you how to resize and rename your images in here.
Import all of your images into the program
Colour edit them if you want to / know how to (or leave this option out)
Export your images
When you press the Export button, the below window will appear. I have screen shot the window as it pops up on your Lightroom screen with what to fill in and where, just view the images. - There are two images as you scroll down in the pop-up box.


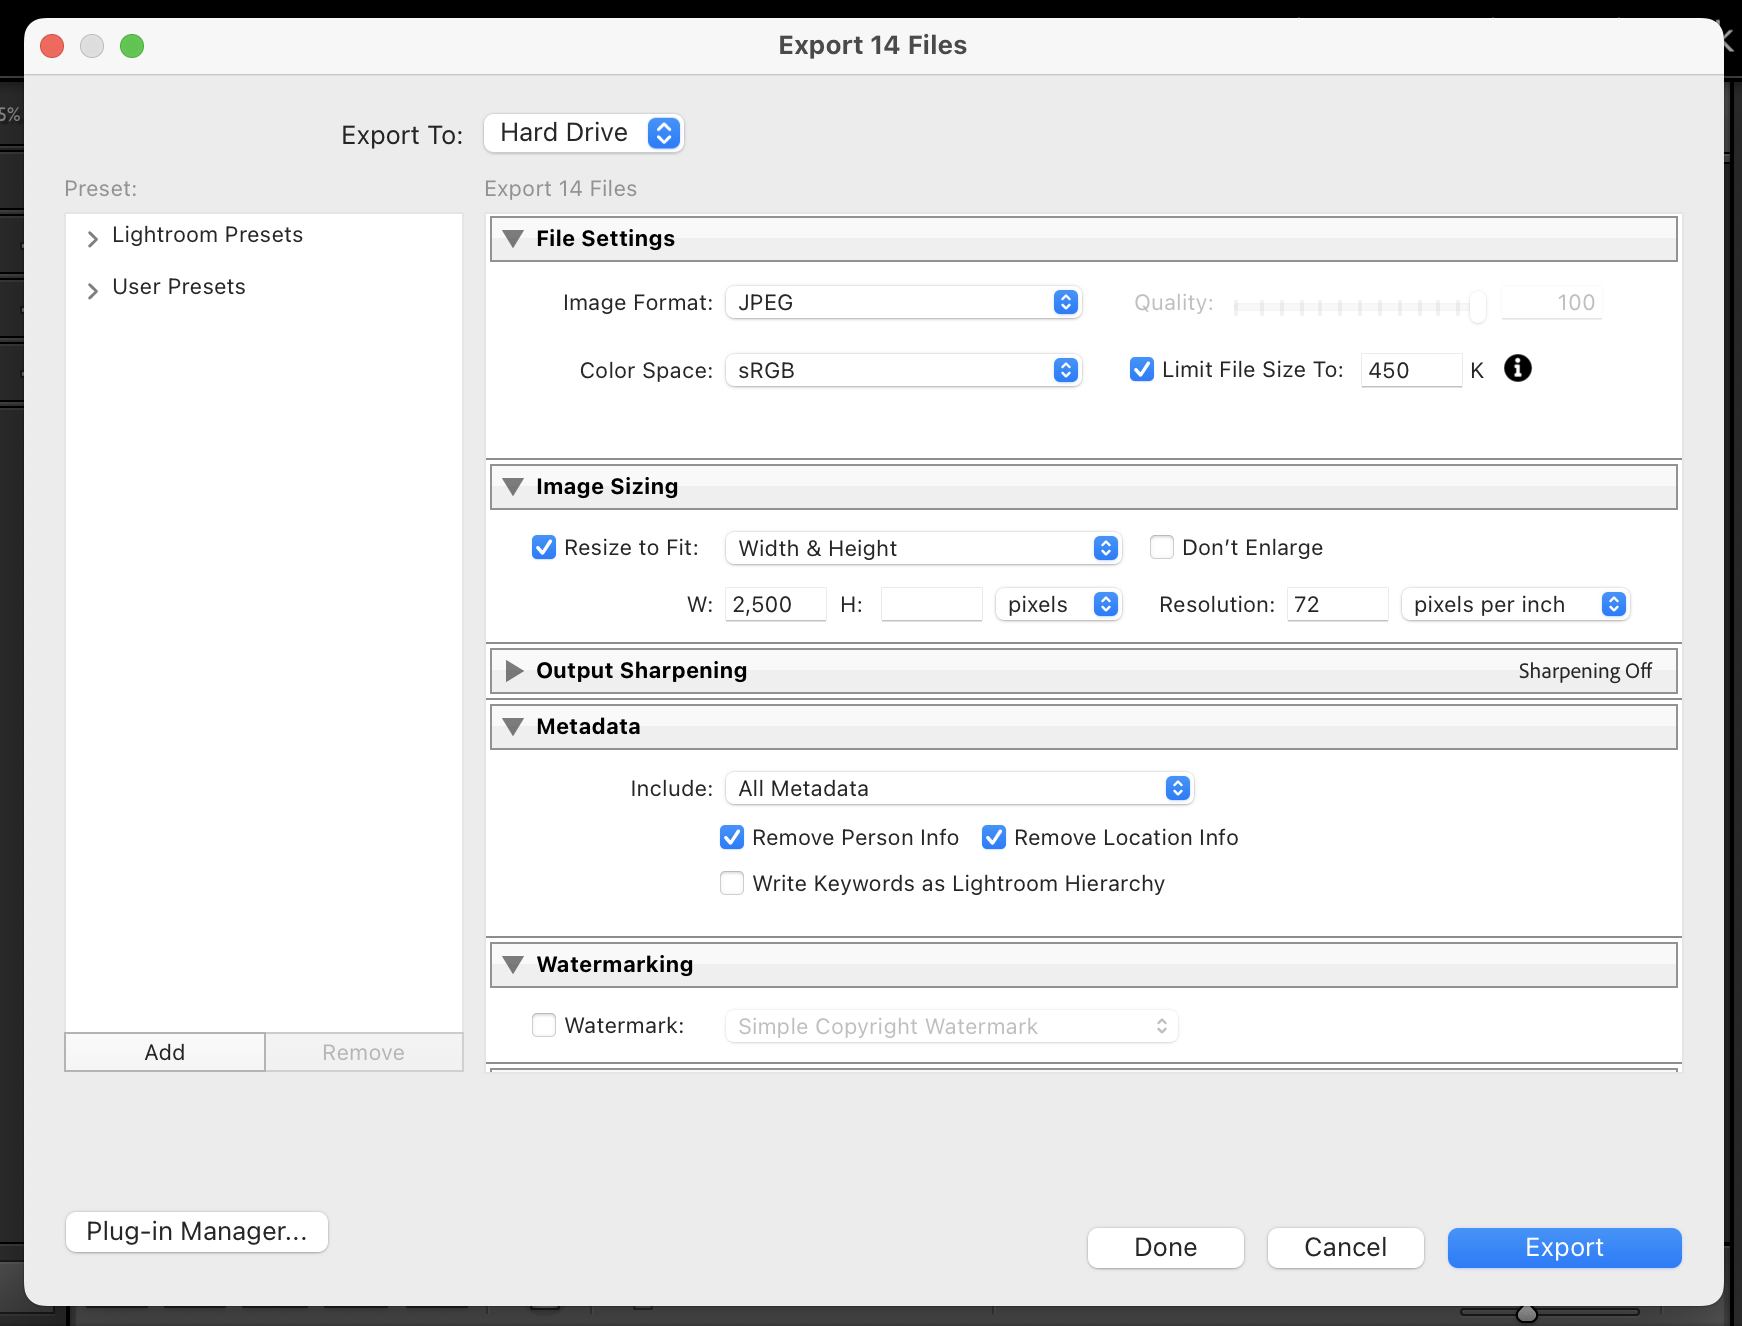
**Top Tip: Avoid increasing the image size as this will make the image blurry, it’s ok to decrease image size but not to make it bigger.
And that is everything about resizing images in Squarespace , now we move onto the second step in the image optimisation process…
2. Renaming Images in Squarespace
We want search engines like Google to find your website when someone is typing in a question that you are the solution for. When you rename images with descriptive and relevant file names, search engines can use this information to better understand what your website is about and display it to users searching for similar content.
So say for example someone types into Google, I hate my job and how do I start my own business? … and you know, that’s exactly the kind of problem you help solve…
If you have images on your website that say “elizabeth ellery 2023 photoshoot.jpg” how is Google to know that you can help that person? Well of course, they can’t!
Now if you had an image on your website that said “elizabeth-ellery-start-your-business-today.jpg” Google is more likely to send someone your way
Or if they were to write… “I’m looking for a mindset coach” - then your image could say “elizabeth-ellery-mindset-coach.jpg”
Both of these examples are if they were a picture of you. If the image you were renaming was of a notebook and pen, you’d want it to be descriptive of the image. That is super important, you must always describe the image. So with the notebook example you might say… “notebook-for-mindset-coach.jpg”
Recommended Naming Ideals for Squarespace Images:
Use descriptive names: As I’ve just written about above, use descriptive names that accurately reflect the content of the image. This makes it easier for search engines to understand the content of the image.
Avoid using special characters: Avoid using special characters like @, !, #, $, %, &, *, and so on in filenames, as they can cause issues with website optimization and compatibility with different systems.
Keep filenames short and descriptive: Try to keep filenames short and descriptive, while still conveying the content of the image. Use 5-6 words max!
Avoid duplicate filenames: Try to avoid duplicating your filenames as this can cause confusion and may affect your website's SEO. By giving each image a unique filename, you can ensure that search engines can accurately index and display your images.
Delete old images and upload new named images: You MUST delete the image you want to rename and re-upload it with the new name. There is a feature in Squarespace where you can rename the image in the image upload window - this does not work!!! Google will only remember the name of the file as you uploaded it directly from your website so you must do it on the image as you upload it.
Use lowercase letters: Squarespace automatically converts uppercase letters to lowercase, so it's best to use all lowercase letters in image names to avoid any confusion.
Use hyphens to separate words: Use hyphens (-) to separate words in image names. Avoid using underscores (_) or spaces, as these can cause issues with website optimization. Google can’t read words if they’re not connected by a hyphen.
Example Bad: Elizabeth Ellery Branding & Squarespace website designer.jpg
Example Good: elizabeth-ellery-branding-squarespace-website-designer.jpg
Include keywords: Include relevant keywords in the image name, but be sure to use them naturally and avoid keyword stuffing.
Don’t know what a keyword is? Let me explain…
In terms of SEO, the word keyword refers to a word or phrase that is used to identify the main topic or theme of a web page. How we’re using keywords in this article, is in our images but of course you’ll want to add your keywords into your website copy too!
Keywords are important in SEO because they are used by search engines to determine the relevance of a page to a user's search query.
When someone enters a search term into a search engine like Google, the search engine uses complex algorithms to analyse the content of web pages and determine which pages are most relevant to the search query. One of the factors that search engines consider when determining relevance is the use of relevant keywords on a page.
For example, if someone searches for "best Italian restaurants in New York City," the search engine will look for web pages that contain those keywords and related keywords, such as "Italian cuisine," "pizza," and "pasta." The search engine will then use a variety of other factors, such as the authority of the website and the quality of the content, to rank the pages in order of relevance.
In SEO, it's important to choose relevant and specific keywords that accurately reflect the content of your web pages. By doing so, you can improve your chances of ranking higher in search engine results pages (SERPs) and driving more traffic to your website. However, it's also important to avoid keyword stuffing, or the overuse of keywords in an attempt to manipulate search engine rankings. This can actually have the opposite effect and harm your SEO efforts. Check out UberSuggest Keyword Idea generator which is an awesome tool for you to search for keywords for your business.
**Top Tip. When using UberSuggests keyword tool and you’ve entered in some keywords you think will work for your business, look a the SEO difficulty column, you want to make sure that the colour is green. If you’re new to SEO, then any other colour than green will be extremely difficult to rank for so there’s no point because Google won’t find you amongst other websites. You also want the volume column to be higher than 100 really.
Step-by-step instructions for renaming images on your computer:
I recommend doing this individually as you don’t want to have any duplicate file names.
Select the image you want to rename.
Right-click on the image and select "Rename."
Type in the new name for the image and press Enter. Make sure to follow the recommended naming conventions for Squarespace images.
By following these recommended naming conventions and best practices, you can optimise your Squarespace images for search engines and provide a better user experience for your visitors.
3. Uploading Images to Squarespace
You can upload images to Squarespace by following these simple steps:
Log in to your Squarespace account and navigate to the page where you want to add an image.
Click on the "Edit" button to open the page editor.
Click on the "+" button in classic 7.1 editor or “+ add block” in Fluid Engine - where you want to add the image.
Select "Add an image" from the block menu.
Choose “Upload file” and click “open” and that will upload the image from your computer.
If you need to add more images, repeat these steps for each image.
When you're finished editing the page, click "Save" or "Publish" to make the changes live on your website.
Let’s talk about Alt Tags…
What are they?
Alt tags and image file names serve different purposes on a webpage.
Alt tags, also known as "alt attributes" or "alt descriptions," are HTML tags that provide alternative text descriptions of images on a webpage. Alt tags are important for web accessibility, as they allow people who use screen readers or have other visual impairments to understand the content of images on a webpage.
Alt tags should be brief (yet they can be much longer than image file names), descriptive, and convey the content and context of the image.
Here is an example of an image alt tag on my website…
intuitive brand and website designer for female entrepreneurs who want a website to give them confidence
Notice, alt tags don’t need hyphens to separate them, I do like to keep mine lowercase still
While alt tags and image file names are both important for optimising images on a webpage, they serve different purposes and should be used in different ways. Alt tags are used to provide alternative text descriptions for images, while image file names are used to provide descriptive names for the image files themselves. By using both alt tags and descriptive image file names, you can improve the accessibility and SEO of your website.
Adding alt tags
If you're uploading a new image to your Squarespace website, you can add an alt tag during the image upload process (see above steps)...
All you need to do is add the alt tag image in the image pop up box, to the “Image alt tag” section
Oh man oh man, I cannot tell you how bloody pleased I am to have written this post today. It feels like such an important one even if it’s not perhaps the most exciting of posts - I much prefer posts when I chat about brand colours or something like that haha.
It’s important because having smaller, correctly sized web images that are named correctly with your industry keywords in place WILL HELP YOU GET FOUND ON GOOGLE!!!
This shit is really really important for your website to be found organically, yes it’s a bit labour intensive but please do put aside some time to do this and you’ll thank me in time I promise you. And if you didn’t already know - SEO is a long term marketing strategy. It doesn’t happen overnight, just keep at it!
Whenever you write a new blog post, be sure to keep those blog posts optimised. Add new relevant keywords into your blog copy AND the images you’re adding into your copy.
I actually wanted to show you something.
For this blog post, I did a search in UberSuggest for what keywords I’d used in my copy and also for naming my images.
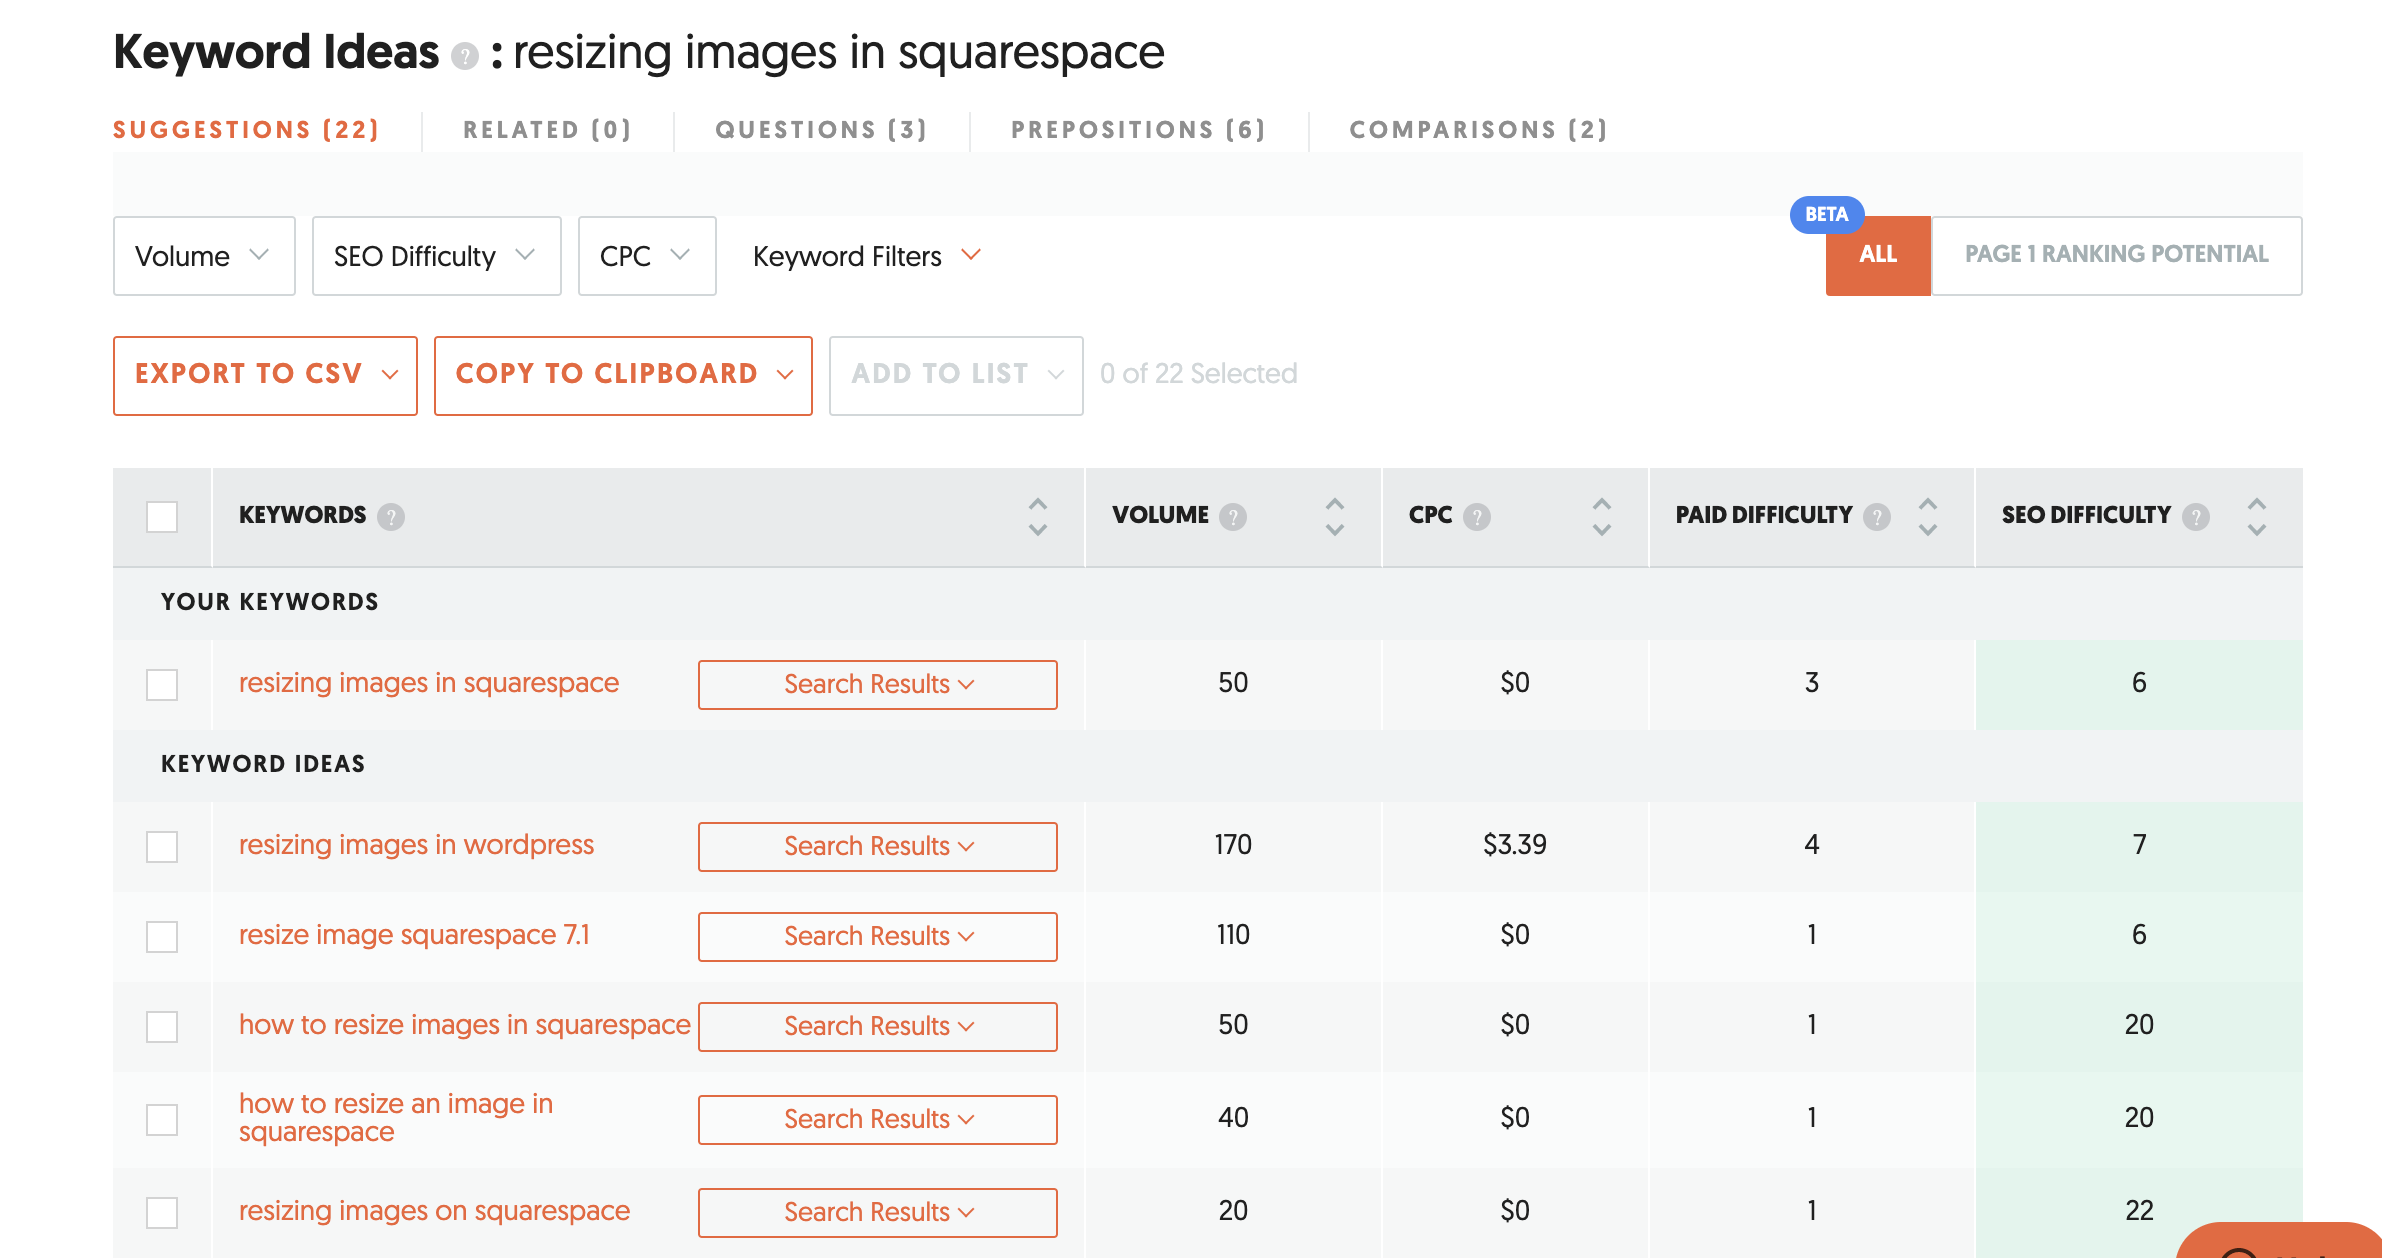
Turns out people aren’t searching for “naming (or renaming) website images” but people were searching for “resizing images in squarespace” so that’s the keyword I’ve focused on for this blog post. You’ll notice I’ve used it a few times in the copy but I’ve also used it on all of the images seen in this post today. You can see on the image below, how I have named my images in reflection to the above UberSuggest keyword suggestions. I love how they’re all Green!

In conclusion…
Optimising (resizing and renaming) images for your Squarespace website can have a big impact on your website's performance, user experience, and search engine visibility. Resizing images can help reduce page load times and improve site speed, while renaming images using descriptive, keyword-rich file names can help improve SEO and make it easier for search engines to understand the content of your website.
So if you haven't already, take action and start optimising your images today!
Investing in getting this done for your Squarespace website is an investment in the success of your website, and it's a simple step that can pay off in big ways.
Please please do let me know if this has been helpful to you and if you have any questions, pop them in the comments box below, big love my gorgeous image optimising buddy!!!